Continue building your plugin!
If you followed the first part of the Getting Started Guide, you should have a freshly written plugin that places a colored line in the message sidebar. This guide picks up where we left off, and goes a bit more in depth explaining what each part of the code does.
We're going to build on your new plugin to show the sender's Gravatar image in the sidebar, instead of just a colored line.
If you don't still have it open, find the plugin source in~/.nylas/dev/packagesand open the contents in your favorite text editor.
We use CJSX, a CoffeeScript syntax for JSX, to streamline our plugin code. For syntax highlighting, we recommend Babel for Sublime, or the CJSX Language Atom package.
Changing the data
Let's poke around and change what the sidebar displays.
Just like in the last tutorial, you'll find the code responsible for the sidebar inlib/my-message-sidebar.cjsx. Take a look at therendermethod -- this generates the content which appears in the sidebar.
(How does it get in the sidebar? SeeInterface Conceptsand look atmain.cjsxfor clues. We'll dive into this more later in the guide.)
We can change the sidebar to display the contact's email address as well. Check out theContact attributesand change the_renderContentmethod to display more information:
_renderContent: =>
  <div className="header">
  <h1>Hi, {@state.contact.name}
  ({@state.contact.email})!</h1>
  </div>
After making changes to the plugin, reload N1 by going toDeveloper > Reload.
Installing a dependency
Now we've figured out how to show the contact's email address, we can use that to generate theGravatarfor the contact. However, as per theGravatar documentation, we need to be able to calculate the MD5 hash for an email address first.
Let's install themd5plugin and save it as a dependency in ourpackage.json:
$ npm
install
md5
--save
Installing other dependencies works the same way.
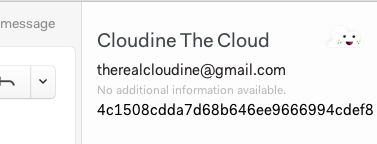
Now, add themd5requirement inmy-message-sidebar.cjsxand update the_renderContentmethod to show the md5 hash:
md5 = require 'md5'

class MyMessageSidebar
  extends React.
  Component
  @displayName: 'MyMessageSidebar'

  ...

  _renderContent: =>
  <div className="header">
  {md5(@state.contact.email)}
  </div>
JSX Tip: The
{..}syntax is used for JavaScript expressions inside HTML elements.Learn more.
You should see the MD5 hash appear in the sidebar (after you reload N1):
Let's Render!
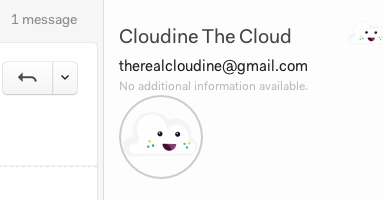
Turning the MD5 hash into a Gravatar image is simple. We need to add an<img>tag to the rendered HTML:
_renderContent =>
    <div
      className="header">
      <img
        src={'http://www.gravatar.com/avatar/' + md5(@state.contact.email)}/>
    </div>
Now the Gravatar image associated with the currently focused contact appears in the sidebar. If there's no image available, the Gravatar default will show; you canadd parameters to your image tagto change the default behavior.
![]()
Styling
Adding styles to our Gravatar image is a matter of editingstylesheets/main.lessand applying the class to ourimgtag. Let's make it round:
stylesheets/main.less
.gravatar {
    border-radius: 45px;
    border: 2px solid #ccc;
}
lib/my-message-sidebar.cjsx
_renderContent =>
  gravatar = "http://www.gravatar.com/avatar/" + md5(@state.contact.email)

  <div className="header">
  <img src={gravatar} className="gravatar"/>
  </div>
lib/my-message-sidebar.cjsx
_renderContent =>
  gravatar = "http://www.gravatar.com/avatar/" + md5(@state.contact.email)

  <div className="header">
  <img src={gravatar} className="gravatar"/>
  </div>
React Tip: Remember to use DOM property names, i.e.
classNameinstead ofclass.
You'll see these styles reflected in your sidebar.
If you're a fan of using the Chrome Developer Tools to tinker with styles, no fear; they work in N1, too. Open them by going toDeveloper > Toggle Developer Tools. You'll also find them helpful for debugging in the event that your plugin isn't behaving as expected.
Step 3: Adding a Data Store
Now let's introduce a data store to give our sidebar superpowers.
Stores and Data Flow
The Nylas data model revolves around a centralDatabaseStoreand lightweightModelsthat represent data with a particular schema. This works a lot like ActiveRecord, SQLAlchemy and other "smart model" ORMs. See theDatabaseexplanation for more details.
Using theFlux patternfor data flow means that we set up our UI components to 'listen' to specific data stores. When those stores change, we update the state inside our component, and re-render the view.
We've already used this (without realizing) in theGravatar sidebar example:
  componentDidMount: =>
  @unsubscribe = FocusedContactsStore.listen(@_onChange)
  ...
  _onChange: =>
  @setState(@_getStateFromStores())

  _getStateFromStores: =>
  contact: FocusedContactsStore.focusedContact()
In this case, the sidebar listens to theFocusedContactsStore, which updates when the person selected in the conversation changes. This triggers the_onChangemethod which updates the component state; this causes React to render the view with the new state.
To add more depth to our sidebar plugin, we need to:
- Create our own data store which will listen to
FocusedContactsStore - Extend our data store to do additional things with the contact data
- Update our sidebar to listen to, and display data from, the new store.
In this guide, we'll fetch the GitHub profile for the currently focused contact and display a link to it, using theGitHub API.
Creating the Store
The boilerplate to create a new store which listens toFocusedContactsStorelooks like this:
lib/github-user-store.coffee
Reflux = require 'reflux'
  {FocusedContactsStore} = require 'nylas-exports'

  module.exports =

  GithubUserStore = Reflux.createStore

  init: ->
  @listenTo FocusedContactsStore, @_onFocusedContactChanged

  _onFocusedContactChanged: ->
  # TBD - This is fired when the focused contact changes
  @trigger(@)
(Note: You'll need to set up therefluxdependency.)
You should be able to drop this store into the sidebar example'scomponentDidMountmethod -- all it does is listen for theFocusedContactsStoreto change, and thentriggerits own event.
Let's build this out to retrieve some new data based on the focused contact, and expose it via a UI component.
Getting Data In
We'll expand the_onFocusedContactChangedmethod to do something when the focused contact changes. In this case, we'll see if there's a GitHub profile for that user, and display some information if there is.
request = require 'request'

  GithubUserStore = Reflux.createStore
  init: ->
  @_profile = null
  @listenTo FocusedContactsStore, @_onFocusedContactChanged

  getProfile: ->
  @_profile

  _onFocusedContactChanged: ->
  # Get the newly focused contact
  contact = FocusedContactsStore.focusedContact()
  # Clear the profile we're currently showing
  @_profile = null
  if contact
  @_fetchGithubProfile(contact.email)
  @trigger(@)

  _fetchGithubProfile: (email) ->
  @_makeRequest "https://api.github.com/search/users?q=#{email}", (err, resp, data) =>
  console.warn(data.message) if data.message?
  # Make sure we actually got something back
  github = data?.items?[0] ? false
  if github
  @_profile = github
  console.log(github)
  @trigger(@)

  _makeRequest: (url, callback) ->
  # GitHub needs a User-Agent header. Also, parse responses as JSON.
  request({url: url, headers: {'User-Agent': 'request'}, json: true}, callback)
lback)
Theconsole.logline should show the GitHub profile for a contact (if they have one!) inside the Developer Tools Console, which you can enable atDeveloper > Toggle Developer Tools.
You may run into rate-limiting issues with the GitHub API; to avoid these, you can add authentication with a pre-baked token by modifying the HTTP request your store makes.Caution! Use this for local development only.You could also try implementing a simple cache to avoid making the same request multiple times.
Display Data
To display this new data in the sidebar, we need to make sure our component is listening to the store, and load the appropriate state when it changes.
import _ from 'underscore';
import request from 'request';
import NylasStore from 'nylas-store';
import {FocusedContactsStore} from 'nylas-exports';

// This package uses the Flux pattern - our Store is a small singleton that
// observes other parts of the application and vends data to our React
// component. If the user could interact with the GithubSidebar, this store
// would also listen for `Actions` emitted by our React components.
class GithubUserStore extends NylasStore {
  constructor() {
    super();

    this._profile = null;
    this._cache = {};
    this._loading = false;
    this._error = null;

    // Register a callback with the FocusedContactsStore. This will tell us
    // whenever the selected person has changed so we can refresh our data.
    this.listenTo(FocusedContactsStore, this._onFocusedContactChanged);
  }

  // Getter Methods

  profileForFocusedContact() {
    return this._profile;
  }

  loading() {
    return this._loading;
  }

  error() {
    return this._error;
  }

  // Called when the FocusedContactStore `triggers`, notifying us that the data
  // it vends has changed.
  _onFocusedContactChanged = () => {
    // Grab the new focused contact
    const contact = FocusedContactsStore.focusedContact();

    // First, clear the contact that we're currently showing and `trigger`. Since
    // our React component observes our store, `trigger` causes our React component
    // to re-render.
    this._error = null;
    this._profile = null;

    if (contact) {
      this._profile = this._cache[contact.email];
      if (this._profile === undefined) {
        // Make a Github search request to find the matching user profile
        this._githubFetchProfile(contact.email);
      }
    }

    this.trigger(this);
  }

  _githubFetchProfile(email) {
    this._loading = true
    this._githubRequest(`https://api.github.com/search/users?q=${email}`, (err, resp, data) => {
      if (err || !data) {
        return;
      }

      if (data.message !== undefined) {
        console.warn(data.message);
      }

      // Sometimes we get rate limit errors, etc., so we need to check and make
      // sure we've gotten items before pulling the first one.
      let profile = false;
      if (data && data.items && data.items[0]) {
        profile = data.items[0];
      }

      // If a profile was found, make a second request for the user's public
      // repositories.
      if (profile !== false) {
        profile.repos = [];
        this._githubRequest(`https://api.github.com/search/repositories?q=user:${profile.login}&sort=stars&order=desc`, (reposErr, reposResp, repos) => {
          // Sort the repositories by their stars (`-` for descending order)
          profile.repos = _.sortBy(repos.items, (repo) => -repo.stargazers_count);
          // Trigger so that our React components refresh their state and display
          // the updated data.
          this.trigger(this);
        });
      }

      this._loading = false;
      this._profile = this._cache[email] = profile;
      this.trigger(this);
    });
  }

  // Wrap the Node `request` library and pass the User-Agent header, which is required
  // by Github's API. Also pass `json:true`, which causes responses to be automatically
  // parsed.
  _githubRequest(url, callback) {
    return request({url: url, headers: {'User-Agent': 'request'}, json: true}, callback);
  }
}

export default new GithubUserStore();
Now we can access@state.github(which is the GitHub user profile object), and display the information it contains by updating therenderandrenderContentmethods.
Extending The Store
To make this plugin more compelling, we can extend the store to make further API requests and fetch more data about the user. Passing this data back to the UI component follows exactly the same pattern as the barebones data shown above, so we'll leave it as an exercise for the reader. :)
You can find a more extensive version of this example in oursample plugins repository.